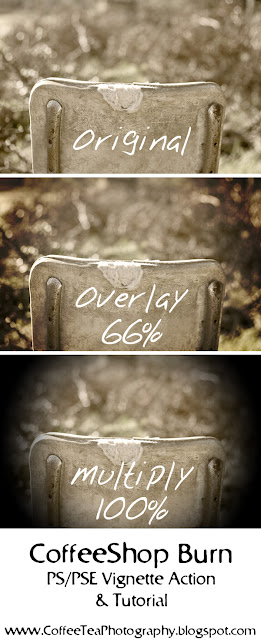
I have already written the CoffeeShop Vignette action and tutorial, but I discovered another way to make a vignette and it is so easy! One is not better than the other, but I usually use CoffeeShop Burn because it is fast. If you want to download the Photoshop/Photoshop Elements action made from this tutorial, you can find the download link at the bottom of this post.
Start with a flattened image. Press D to set your default black foreground and white background color pallet. Add an Gradient adjustment layer (not to be confused with a Gradient Map).
Change the Style to Radial, Scale to 150%, and make sure Reverse is checked. Then click on the Gradient to make additional changes.
Move the upper right Opacity Stop to the middle (the Location should read 50%). This can be adjusted to taste. The lower the percentage, the smaller the vignette.
The final step is to put the blending mode to a setting which appeals to you. This is Overlay blending mode, 50% opacity. I also love using multiply, soft light, vivid light, and even hard light in different images. This is something that has to be decided with each individual image.
Download the CoffeeShop Burn PS/PSE Action HERE!
Do you want to download thousands of professional CoffeeShop PSE/Photoshop actions (including exclusive ones not found anywhere for free), textures/overlays, scrapbooking papers, clip art/design elements, photo storyboards and frames, and Lightroom presets from this site in one convenient zipped file AND help support this one-woman blog?
Just click here for my CoffeeShop Mega Download Pack!


Thank you so much for this Freebie. I want to let you know that I posted a link to your blog in Creative Busy Hands Scrapbook Freebies Search List, under the Photoshop/Gimp Resource(s) (Brush(es), Swatch/Palette, ...) post on Jun. 28, 2009. Thanks again.
ReplyDeleteThank you. :0)
ReplyDeletethank you so much . love your actions and your new blog look
ReplyDeleteHey I have an award for you on my blog because I think you are awesome!! :)
ReplyDeleteThank you so much for these .... I really like all your actions and appreciate all your hard work and your sharing them with us!
ReplyDelete~Heather
love. love. love this. thankyou.
ReplyDeleteAwesome. Thanks! I changed my foreground to white to get a nice soft white vignette around some baby photos that were on a light pink background. Turned out great!
ReplyDeleteYes! thank you! i am LOVING your actions and can't believe I can do these finally on PSE! Your directions are so clear and easy to follow for a very novice PSE user like myself! thank you for your generosity!
ReplyDeleteThank you very much but how can I change from black to white?bye,Thanks
ReplyDeleteThank you! This is awesome :) Katie
ReplyDeleteAwesome! I was able to get a vignette look on my pictures. I was also able to save the gradient - but that didn't save the radial/reversed part of it. I don't have Internet on my computer right now (reading from phone) so I can't download the action - but will that have the radial etc saved?
ReplyDelete